1. The Google Maps element do not load and show up. What do I do?
2. Some bundled plugins cannot be updated. They tell me to register with their own license first. What to do?
3. How to adjust CSS for different screen sizes?
4. I cannot open portfolio single page. I only see "404 Page Not Found". What to do?
5. How to create and show portfolio on the page?
6. Style Customizer is not saving the changes. What should I do?
7. General troubleshooting steps
8. I couldn't update the bundled plugins with the theme purchase code. Why?
9. Setting up automatic updates
10. I want to have all the content like the demo site. How do I do that?
11. OptionTree could not be downloaded and installed. What to do?
1. The Google Maps element do not load and show up. What do I do?
Please first update the theme to the latest version. After that, go to "Theme Options > Google Maps" to enter your API key and save. Clear all cache and check it again. The maps should load properly now.
2. Some bundled plugins cannot be updated. They tell me to register with their own license first. What to do?
There are two different cases here:
Case 1: The bundled plugins cannot be updated right after finished updating the theme
You find that the newer versions of the bundled plugins already come with the latest version of the theme. You normally can update them via WP but this time the plugins prevent you from the update.
Symptoms
This is the case that after you finished updating the theme, you see a notification to update the bundled plugins on your WP like this:
You then click "Begin updating plugin" and try to update the plugin in the next screen but you get the message like this:
Note that in this case, the bundled plugin is only Visual Composer. There can be any other bundled plugins that give the similar message, for example, Revolution Slider, LayerSlider, etc. and you cannot then update them via the theme.
Solution
On your WP panel, go to the "Plugins" menu and disable the plugins in question first. Then try to update them once again using the same method. This should let the update pass the registering/activating process of the plugin. Finally you should see a complete message like this:
Now just reactivate the plugin after the update.
Case 2: You just see a notification from the bundled plugins to register/activate them to receive auto update
In this case, you can just ignore the notification as you get the plugins with the theme (bundled ones). So you do not have the purchase code of the plugins to register or activate them. Normally the bundled plugins will be updated periodically with the new version of the theme.
Or, you may consider purchasing the plugins separately to get their own purchase code so you can use the auto update of the plugins without waiting the next version of the theme. But we cannot guarantee the plugin support as we only test with the version that comes with the theme.
3. How to adjust CSS for different screen sizes?
There are times when you wanted to use CSS code for different screen sizes. For example, you want to display the tagline normally on PC, but you want it to be hidden when viewing on a mobile.
4. You can enter any custom CSS code into the "Additional CSS" section that is in the theme customizer.
4. I cannot open portfolio single page. I only see "404 Page Not Found". What to do?
Please go to "Settings > Permalinks" and click to save once. This should solve the issue.
5. How to create and show portfolio on the page?
Please find below for the summary of how to add portfolio into the page:
1. Go to "Portfolio > Add New Portfolio Item" to add each portfolio item. Repeat this until you get all the items you want.
2. Go to "Page > Add New" to add a page for listing all those created portfolio items.
3. In the page edit screen, click "Visual Composer" button to enable Visual Composer editor then click "Add element > Portfolio" to add the Portfolio element into the page. You can set some element options here, for examples, which portfolio categories to display, how many items, etc.
Note: I would also recommend to see the documentation for how to import the XML dummy data to get most posts/pages like showing on the demo and you can use them as examples. You can start from there or you might get some idea when browsing through the sample pages.
6. Style Customizer is not saving the changes. What should I do?
This issue is mostly caused by the server side or the WordPress installation. On the Style Customizer screen, after saving, if you check the Chrome browser's console in Developer Tools, you may see the error message like "403", "405" or "500 Internal Server Error" or some kind of AJAX stuff (or, in a very rare case, you may see nothing about the error).
I would suggest to firstly uninstall the current WordPress and theme then try the following steps:
3. Install the theme with all dummy data using steps provided in the theme's documentation.
4. Test the site again.
If the issue still persists, please try it on another servers you have or contact your web hosting and send them the error message you see in the Chrome's console. They should be able to help you out especially for the "500" error code.
Another possible reason is the PHP version on your server. Make sure that your server has the up-to-date PHP version installed.
7. General troubleshooting steps
When there's something wrong happened with your WordPress site, don't panic. In many cases, the cause of issues can be found and solved easily. Please try the following troubleshooting steps:
First, make sure that everything is up-to-date on your site (WordPress, themes, and plugins).
If you still have issues, try to switch the theme to the default WordPress' Twenty [xxx] theme (for example, Twenty Seventeen) to make sure that the issues you are having are related to the UXBARN theme you are using. If the issues are still there after switching themes, it means the issues are not from the theme, but they might be from any of the plugins you are using.
Now you can try to disable the plugins one by one to see if any of them are the cause. If you find ones, please contact the plugin developers.
If the problem occurred after you had customized the theme, try to revert everything back to the default state. This should solve the problem in most of the cases. After that, double check your custom code again before adding it back piece by piece.
The above steps are probably enough for troubleshooting the issues by yourself.
But if you see an error message like "500 Internal Server Error", it means there's something wrong on your server. Please contact your system admin to help you check the server's error log and to solve the issue.
8. I couldn't update the bundled plugins with the theme purchase code. Why?
Since they are "bundled" with the theme, the plugins will only be updated with the newer version of the theme. This is normal for any bundled items. You won't be able to use the theme purchase code to register or update them directly.
If you wanted to directly update the bundled plugins, you would need to purchase them separately to get their own purchase code.
9. Setting up automatic updates
You can set up the automatic updates in our UXBARN themes using the Envato Market plugin. After installing the theme, you should see a notification at the top telling you to install the Envato Market plugin; just install and activate it first.
The idea of this plugin is that, you create and save a token and the plugin will list the items you purchased on the Envato Market (ThemeForest, CodeCanyon, for examples). You can then update the items easily via WordPress Updates.
Please follow the steps below to set up the plugin:
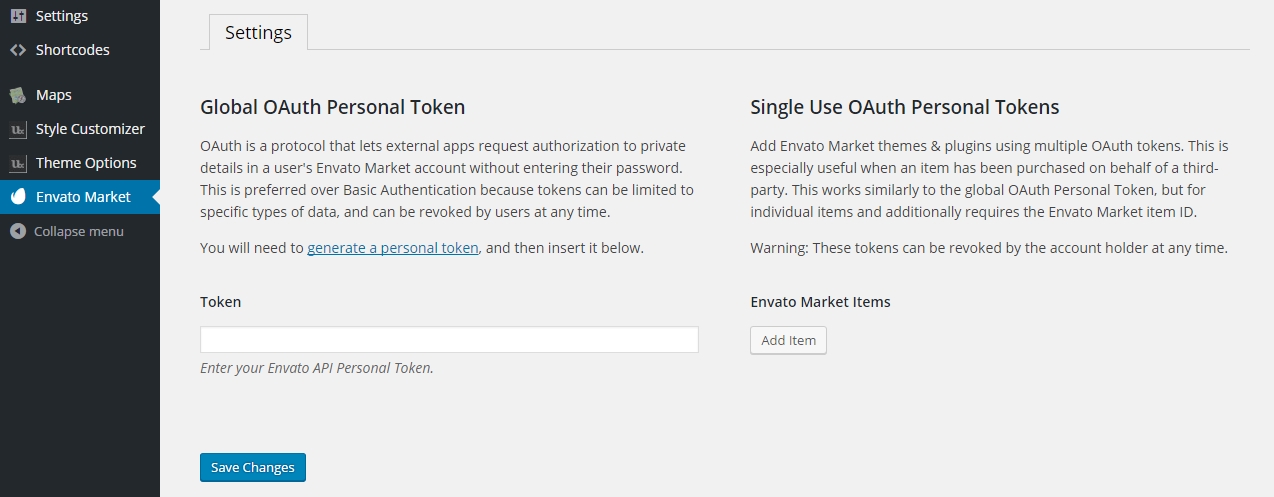
1. After activating the plugin, you will need to configure it by going to the "Envato Market" menu on your WP admin panel. You should see this screen:
2. There are 2 options to choose:
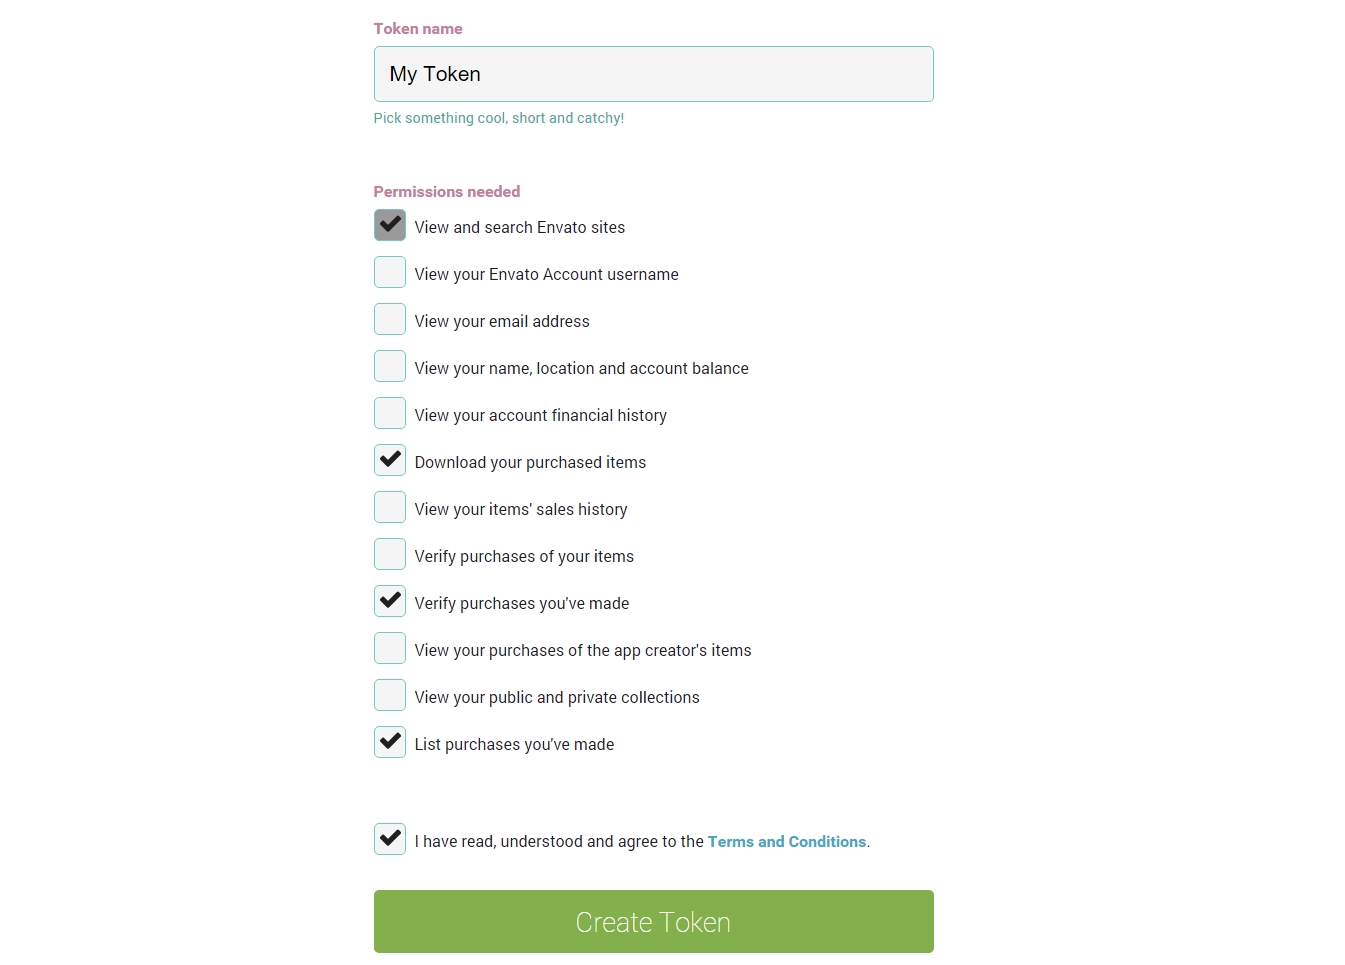
2.1) For Global OAuth Personal Token, it is suitable if this is your own website so once the token is saved, the plugin will list all the purchased items. To start creating the token, click the "generate a personal token" link on the page.
You might then see the login page. Just log in with your account that you used when purchasing the theme. Now you will see the screen like this for creating a new token:
Select the permissions as shown above and click "Create Token". You will finally see a screen showing the information of the created token. Copy that token and put it into the "Token" field on the Envato Market plugin page.
After saving, you will see all of the purchased items of the account that is used to create the token.
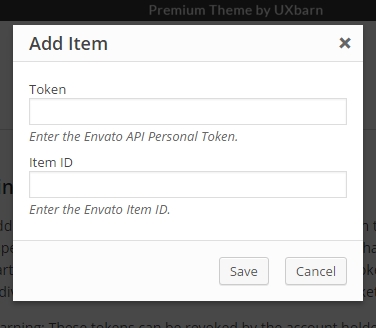
2.2) For Single Use OAuth Personal Token, it is suitable if you create this website for your client so you can specify which items you want them to display. The plugin will show only the added items. The overall concept is similar to the global token instructed above. Once you click the "Add Item" button, you will see this popup window:
Use the same steps as the above global token to create a new token. Or if you already have one, put it into the "Token" field here.
To find the item ID, just go to the item page on ThemeForest then look at the browser's URL field. You will see a number like this "11354296" right after the item name in the. Copy and put it into the "Item ID" field then click "Save".
That's it! If the plugin is properly configured, next time when there is a newer version of the theme available, you will see an update notification on your WP admin.
10. I want to have all the content like the demo site. How do I do that?
You can do that by importing the demo data from the provided XML file which is included in the full purchased package.
For a full guide of how to install the theme (and import the demo data), we would suggest reading through the theme documentation. There are also some useful tutorials provided in the doc to help you get started with the theme.
Note that the documentation is also included right in the purchased package. Just go to the 'Documentation' folder and open the 'index.html' file with your browser.
11. OptionTree could not be downloaded and installed. What to do?
On November 6, 2018, the OptionTree plugin seemed to be somehow disabled on the plugin repository of WordPress.org so you would not be able to download and install it. When you are trying to install the plugin, you might get an error message like this:
Something went wrong with the plugin API.
The issue should be temporary, and it should be online again in a few days.
However, if you are still experiencing the issue, you can manually install the plugin by following these steps:
2. On your WP admin panel, go to \"Plugins > Add New > Upload Plugin\" then browse to the plugin\'s ZIP file you downloaded in step 1 and click the Install Now button.
3. After it is installed, click the Activate Plugin button you see on screen.
* The themes that are affected by this situation are: Kathy, Darren, Alvar, Enso, Viceversa, Nakamura, Finnik, Lowel, Schon, Calmer, Thine, Kose, Fineliner, and Archtek.
Latest Update about OptionTree (April 3, 2019)
The author of OptionTree has already updated the plugin to v2.7.0, but it is currently in a develop branch on their github repo (reference: https://github.com/valendesigns/option-tree/issues/696#issuecomment-476055302 ). Once everything is settled, we will update and include the latest version of OptionTree in the following themes:
Lowel, Schon, Calmer, Thine, Kose, Fineliner, and Archtek
Note that for the other themes (Kathy, Darren, Alvar, Enso, Viceversa, Nakamura, and Finnik), the OptionTree plugin has been replaced with Advanced Custom Fields.