5. Portfolio category images don't show up if Jetpack plugin is active. How to fix that?
Please go to "Jetpack > Settings > Appearance" and disable its Photon feature (screenshot: https://cl.ly/iljb ).
6. How to add a blank menu?
Go to Appearance > Menus and click the Custom Links section. Enter "#" in the URL field and any character in the Link Text field.
Once it is added in the menus, add the "blank-menu" text in the CSS Classes field. If you do not see the field, click Screen Options at the top right of the screen and tick the checkbox to make it visible.
7. I got "Page Not Found" after changing pages on my portfolio. How to fix that?
Please make sure that the portfolio slug is not the same as any page slug.
For example, the theme by default uses "portfolio" as a portfolio slug. If you also have a page that has the same slug as "portfolio", please change the page slug to something else (eg. "my-portfolio").
OR, you might want to change the portfolio slug instead. To do that, go to "Appearance > Customize > Portfolio Options" and scroll down to the bottom. You will see the options to change portfolio slugs there.
After that, go to "Settings > Permalinks" and click save.
This should help.
8. How to adjust CSS for different screen sizes?
There are times when you wanted to use CSS code for different screen sizes. For example, you want to display the tagline normally on PC, but you want it to be hidden when viewing on a mobile.
4. You can enter any custom CSS code into the "Additional CSS" section that is in the theme customizer.
9. I want to have all the content like the demo site. How do I do that?
You can do that by importing the demo data from the provided XML file which is included in the full purchased package.
For a full guide of how to install the theme (and import the demo data), we would suggest reading through the theme documentation. There are also some useful tutorials provided in the doc to help you get started with the theme.
Note that the documentation is also included right in the purchased package. Just go to the 'Documentation' folder and open the 'index.html' file with your browser.
10. Creating a child theme
This article is offered for informational purposes. Please note that while we're happy to provide this guide, we can't offer support for custom code modifications. For details on what our support covers, please review our Item Support Policy.
Before you proceed, it's crucial to understand the steps outlined in this article.
Firstly, ensure your theme is updated to the latest version.
If you're planning to make more than just CSS changes to the theme, we highly recommend using a child theme. A child theme allows you to modify the parent theme's functions, templates, and styles without losing those changes when you update.
For these tasks, you can use an FTP client like FileZilla to connect to the server hosting your WordPress site.
Ready to create a child theme? Follow the steps below:
1. Create a New Folder: Start by creating a new folder for your child theme within the "themes" directory of your WordPress site. The directory path should look something like this:
[root]/wp-content/themes/
For this example, we'll name the child theme's folder "child-theme," making the complete path look like:
[root]/wp-content/themes/child-theme/
2. Add Required Files: Inside the "child-theme" folder, create two essential files: "style.css" and "functions.php."
3. Edit 'style.css': Open the "style.css" file in your child theme and insert the following code at the top:
The crucial part here is the "Template" line. This must match the folder name of the parent theme. For instance, if you're using our Kathy theme as the parent, the "Template" line should read "kathy," like so:
/*
 ...
 Template:     kathy
 ...
*/
Note: If you're using a different theme, adjust this line accordingly.
4. Edit 'functions.php': Now, open the "functions.php" file in your child theme and add the following code at the top:
This action and function instruct WordPress to load the "style.css" file of the child theme, appending it to the parent theme's list of styles on the front end.
5. Activate the Child Theme: Finally, navigate to your WordPress admin panel and go to "Appearance > Themes." You should see your child theme listed among the available themes. Click to activate it.
----------
Overriding Parent Theme's Template Files
If you wish to modify theme template files like "header.php" or "index.php," simply copy the desired file from the parent theme into your child theme folder. You can then make your edits there.
----------
Overriding Parent Theme's Functions
To modify functions from the parent theme—say, the "uxbarn_register_theme_image_sizes()" function—copy only the specific function into the "functions.php" file of your child theme.
* Note: Be sure to copy only the "function() {...}" portion, excluding the "function_exists()" wrapper.
----------
Overriding Parent Theme's CSS
You can do this by either using the "Additional CSS" field in the theme customizer or adding your custom CSS code into the "style.css" file of your child theme.
----------
Important Reminder!
After updating the parent theme to a newer version, always review the code in your child theme. Update it as needed to align with any changes in the parent theme. This practice ensures that your child theme remains up-to-date and avoids potential conflicts.
----------
That should be all the necessary information to help you get started with a child theme!
11. General troubleshooting steps
When there's something wrong happened with your WordPress site, don't panic. In many cases, the cause of issues can be found and solved easily. Please try the following troubleshooting steps:
First, make sure that everything is up-to-date on your site (WordPress, themes, and plugins).
If you still have issues, try to switch the theme to the default WordPress' Twenty [xxx] theme (for example, Twenty Seventeen) to make sure that the issues you are having are related to the UXBARN theme you are using. If the issues are still there after switching themes, it means the issues are not from the theme, but they might be from any of the plugins you are using.
Now you can try to disable the plugins one by one to see if any of them are the cause. If you find ones, please contact the plugin developers.
If the problem occurred after you had customized the theme, try to revert everything back to the default state. This should solve the problem in most of the cases. After that, double check your custom code again before adding it back piece by piece.
The above steps are probably enough for troubleshooting the issues by yourself.
But if you see an error message like "500 Internal Server Error", it means there's something wrong on your server. Please contact your system admin to help you check the server's error log and to solve the issue.
12. Setting up automatic updates
You can set up the automatic updates in our UXBARN themes using the Envato Market plugin. After installing the theme, you should see a notification at the top telling you to install the Envato Market plugin; just install and activate it first.
The idea of this plugin is that, you create and save a token and the plugin will list the items you purchased on the Envato Market (ThemeForest, CodeCanyon, for examples). You can then update the items easily via WordPress Updates.
Please follow the steps below to set up the plugin:
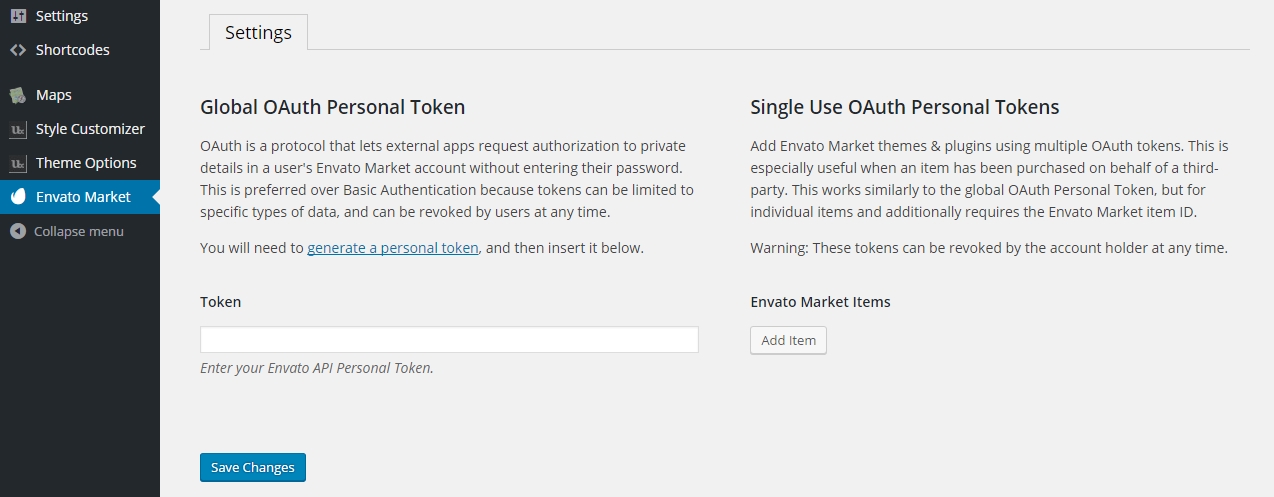
1. After activating the plugin, you will need to configure it by going to the "Envato Market" menu on your WP admin panel. You should see this screen:
2. There are 2 options to choose:
2.1) For Global OAuth Personal Token, it is suitable if this is your own website so once the token is saved, the plugin will list all the purchased items. To start creating the token, click the "generate a personal token" link on the page.
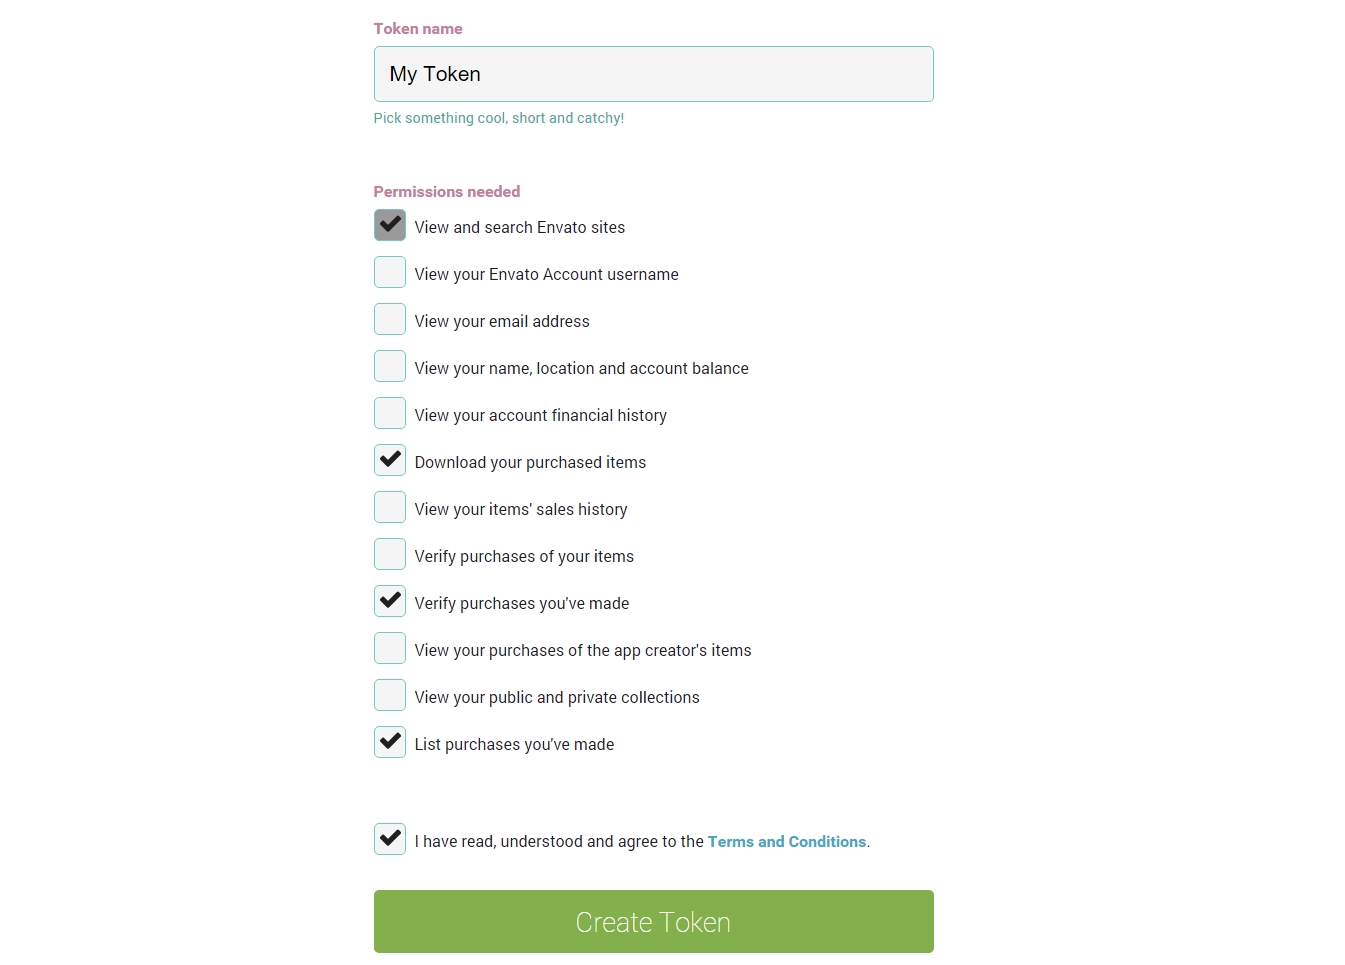
You might then see the login page. Just log in with your account that you used when purchasing the theme. Now you will see the screen like this for creating a new token:
Select the permissions as shown above and click "Create Token". You will finally see a screen showing the information of the created token. Copy that token and put it into the "Token" field on the Envato Market plugin page.
After saving, you will see all of the purchased items of the account that is used to create the token.
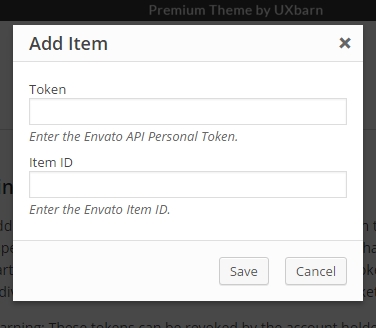
2.2) For Single Use OAuth Personal Token, it is suitable if you create this website for your client so you can specify which items you want them to display. The plugin will show only the added items. The overall concept is similar to the global token instructed above. Once you click the "Add Item" button, you will see this popup window:
Use the same steps as the above global token to create a new token. Or if you already have one, put it into the "Token" field here.
To find the item ID, just go to the item page on ThemeForest then look at the browser's URL field. You will see a number like this "11354296" right after the item name in the. Copy and put it into the "Item ID" field then click "Save".
That's it! If the plugin is properly configured, next time when there is a newer version of the theme available, you will see an update notification on your WP admin.
13. OptionTree could not be downloaded and installed. What to do?
On November 6, 2018, the OptionTree plugin seemed to be somehow disabled on the plugin repository of WordPress.org so you would not be able to download and install it. When you are trying to install the plugin, you might get an error message like this:
Something went wrong with the plugin API.
The issue should be temporary, and it should be online again in a few days.
However, if you are still experiencing the issue, you can manually install the plugin by following these steps:
2. On your WP admin panel, go to \"Plugins > Add New > Upload Plugin\" then browse to the plugin\'s ZIP file you downloaded in step 1 and click the Install Now button.
3. After it is installed, click the Activate Plugin button you see on screen.
* The themes that are affected by this situation are: Kathy, Darren, Alvar, Enso, Viceversa, Nakamura, Finnik, Lowel, Schon, Calmer, Thine, Kose, Fineliner, and Archtek.
Latest Update about OptionTree (April 3, 2019)
The author of OptionTree has already updated the plugin to v2.7.0, but it is currently in a develop branch on their github repo (reference: https://github.com/valendesigns/option-tree/issues/696#issuecomment-476055302 ). Once everything is settled, we will update and include the latest version of OptionTree in the following themes:
Lowel, Schon, Calmer, Thine, Kose, Fineliner, and Archtek
Note that for the other themes (Kathy, Darren, Alvar, Enso, Viceversa, Nakamura, and Finnik), the OptionTree plugin has been replaced with Advanced Custom Fields.